I wanted to make a unique piece of art for our game room in the basement. We have a variation of all entertainment art ranging from music, movies to games. I had an extra "Monopoly Game" and "Scene It DVD Game" game and thought if I hot glued the boards together along with a few other game related items it would look pretty cool. Here is the finished product along with a few close ups. I mainly used a hot glue gun and cardboard wedges to add dimension!"
Thursday, July 26, 2012
Wednesday, July 18, 2012
Cricut Road Sign Art
I wanted to make a few accent pieces of art to go with my Transportation Book Art that I made last week. I didn't make a tutorial on how to make these but here is a general step by step on what to do.
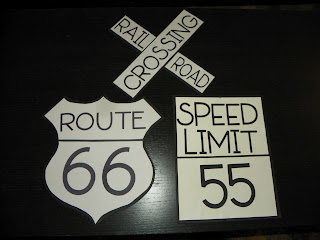
I bought a piece of black tag board and cut into the shapes of the signs I wanted to do. I then cut white scrapbook paper in the same shapes of the signs only slightly smaller so an outer black line would show. I used my Cricut to cut out all of the letters in black paper and simply glued them in place.
I made 3 signs; Route 66, Speed Limit and a Railroad Crossing sign
Here is what the signs look like in my son's room. The railroad sign is not pictured, I hung that by his door.
Wednesday, July 11, 2012
DIY Kids Artwork for under $10
As I transitioned my son's room from a nursery to a "Big Boy" room I wanted to create some fun artwork to put in the space. We decided to go with a transportation theme since he loves all things car/trucks/tractors ect. What you will need for this project: Tag Board, a book, and hot glue gun
I started out with a cardboard transportation book and cut the pages apart. I then spaced them out on the tag board so I could space the colors apart and get a plan before I started to glue them down.
I also cut up a few pieces of cardboard and stacked them together to raise some the pages off the board to add dimension
Here is the finished project! It was cheap, quick and easy, and he loves looking at all the vehicles on the board!
After adding the Road Signs this is what it looks like hanging on my son's wall
Wednesday, July 4, 2012
DIY Kids Floatie Project
My son loves swimming in our pool and likes to wear the Swim School Training Suit to help him stay afloat. I really like the idea of these training suits, however they can be very difficult to get on and off, especially when wet! I looked at the suit trying to figure out an easy fix and thought adding a zipper to the side would do the trick!
Sewing is not one of my strongest abilities. I've done pillows and curtains, but never a zipper. There were a few challenges with the zipper mainly due to the bulk of the floatie and material of the suit getting that through my machine without bunching.
I first cut the top shoulder straps and then down the side along the seam. I chose the side with the inside tag so I could cut the tag out at the same time. My son always complained of the tag scratching him while he swam.
I then sewed the zipper in! I found a zipper at Walmart close to the same color green as the suit. I was surprised how well it turned out with my mediocre sewing abilities.
Here is another look. As a finishing touch I folded the shoulder straps over and sewed them down. As an alternative you could add a clip, button or snap to the shoulder strap to make them easier to get on/off as well.
Subscribe to:
Comments (Atom)


