Thursday, September 27, 2012

Tile Coasters

Here is a tutorial on how to make coasters from tiles. This was an easy project to do, however it did require patients due to wait for each coat to dry fully.


Here is what you will need: Scrapbook paper or photo, Mod Podge, Tiles, Ink pad, Paint brush, Decorative scissors, clear spray paint, Hot glue and Felt

I started by cutting 4 pieces of paper to the approximate size of the tile, I then used the "ripped" decorative scissor to give it a torn paper look

I then rubbed the edges of the paper on the black ink pad. This gives it an aged almost burned look

Next step is to apply the paper to the tiles. I first started by putting Mod Podge on the back of the piece of paper and laying it on the tile. I used a mini rolling pin to get all the air bubbles out. Then I waited for this coat to dry. Once dry I brushed on a coat of Mod Podge over the top as seen in the picture below. I repeated this step 3 more times allowing each coat to dry fully in between. I also sprayed a clear coat of paint as a finishing touch to make it water proof

I cut out felt for the bottom of each tile and used hot glue to attach it

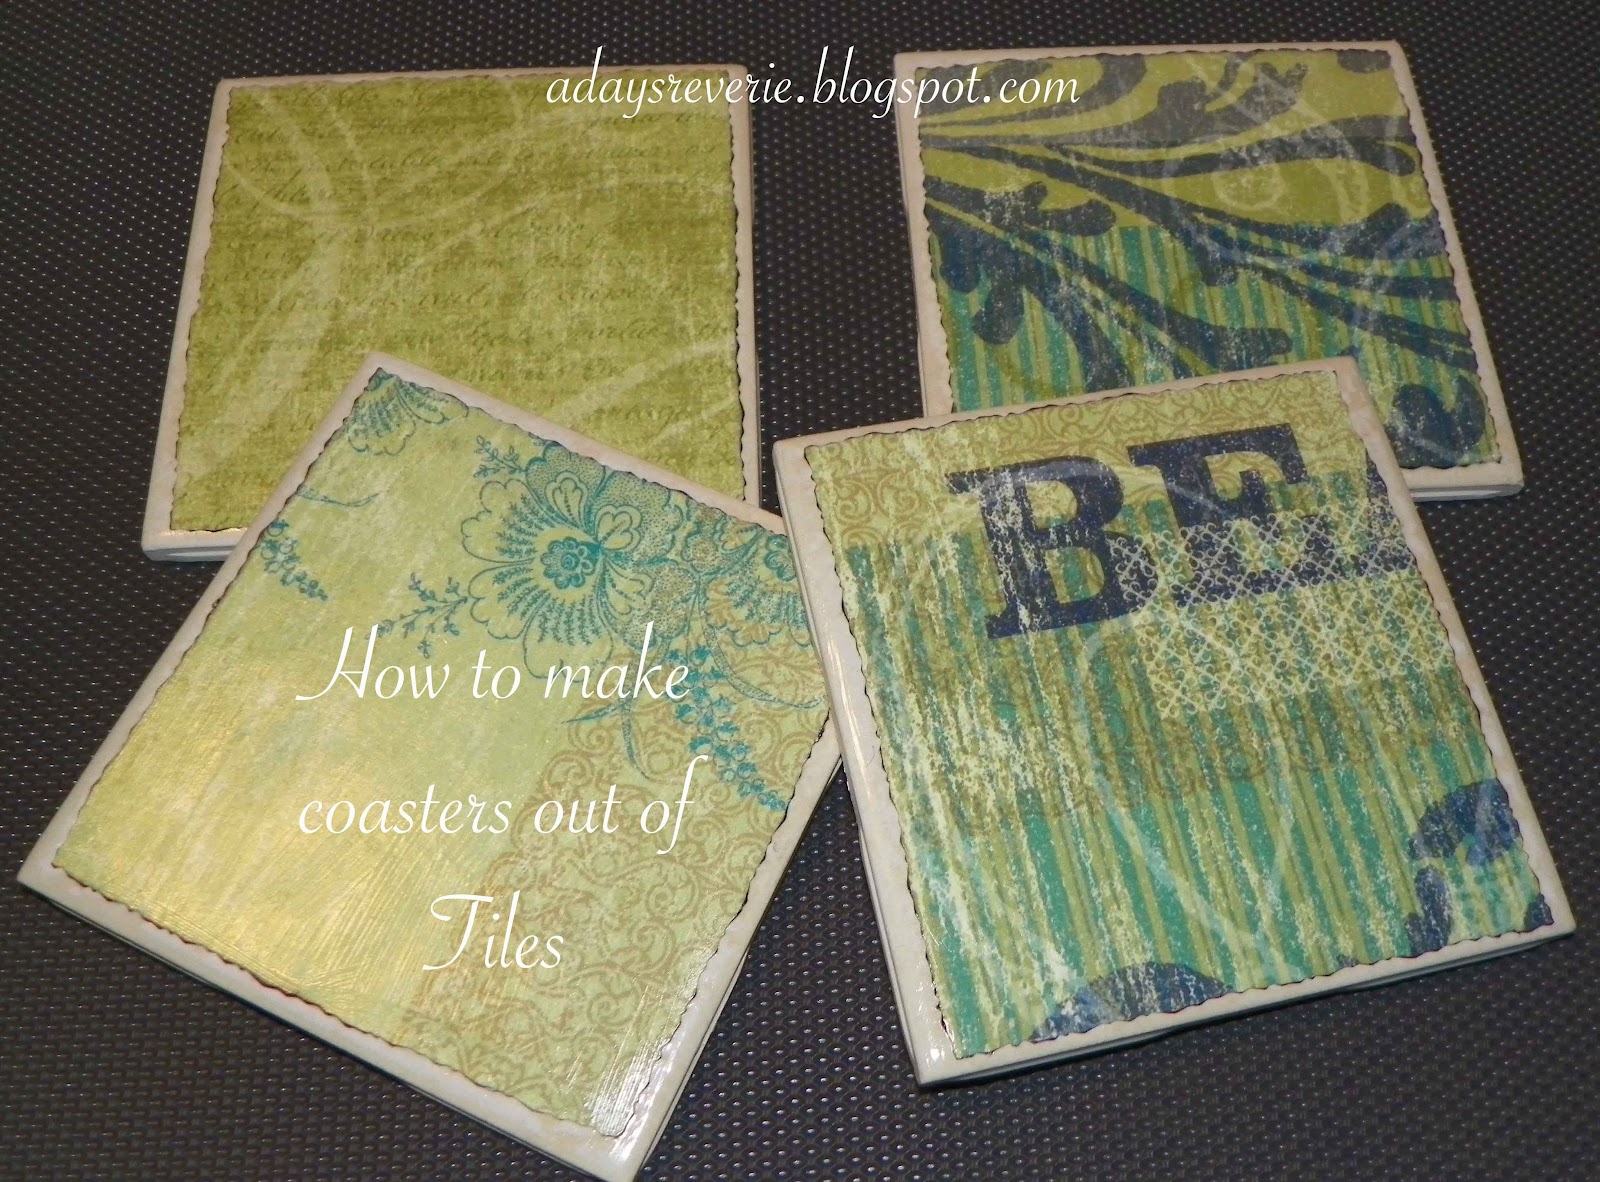
Here's a look at the finished product!


Added 2/9/13: Since posting the tile coasters I have made a few more sets. Here I used book pages and symbols cut out with my Cricut. For Christmas I printed maps of my parents favorite vacation spots and  used them for the coasters. they really turned out well!

Wednesday, September 19, 2012

DIY Keepsake Art

I have been trying to find a neat way to display some of my Grandpa's fishing tackle that I received when he passed away. Some of my best memories are fishing with him and I wanted to make something that did my memories justice. I decided to add it to my craft room wall. 

I took the frame apart and removed the mirror/picture art that it had in place. I saved the backing to use for later. I then painted the frame yellow. It took quite a few coats since the wood was so dark.

I used a piece of scrap fabric that I thought went well with the tackle. I used spray adhesive to attache the fabric to the original backing of the picture. I then used fishing line to sew the pieces into place.

Using a staple gun I attached the backing onto the frame and cut the excess material off. I'm really happy with how it turned out and think its a great way to display something that means so much to me.

Tuesday, September 11, 2012

Button Letter Art

 For my next project for my craft room art I decided to do a button letter. Again, something I've seen done in different ways on Pinterest. I have been going to Goodwill's and other thrift stores to stock up on unique frames for this and future projects for my craft room. I decided to use a basic square frame. You will also need: Buttons, Elmer's Glue Spots, Paint (if your frame needs painting), background paper or fabric

I lightly traced a K on my paper so I would have a general idea of where I wanted the buttons placed. I then did a flat covering of buttons using the glue spots to keep them in place. I tried to get the buttons as close together as I could knowing there would be gaps. 

I then added a second layer of buttons filling in the gaps and adding dimension.

I decided to paint the frame white, it took several coats since the frame was so dark

Here it is! I think it will look a lot better once its hung! I have a lot of ideas and things planned for this wall and don't plan on hanging anything until there are all done! Stay Tuned!!

Saturday, August 25, 2012

Ceiling Medallion Wall Art

Using Ceiling Medallions for wall art is a great way to add color and texture to your room. Pick out a few different shapes and sizes of the medallions and arrange them on the floor in a pattern you like. I recommend buying and odd number, its generally more pleasing to the eye to group things in odd numbers. Each Medallion needs to be primed before painting and will most likely need a few coats of primer and paint. We used spray paint for both. We added wall hanging hooks to the back of each medallion and they were ready to be hung!! 

Here is a look at the finished project! We love the how the yellow really pops in against the gray walls!

Wednesday, August 1, 2012

Framed Dry Erase Weekly Planner

There are a lot of similar ideas of picture frame dry-erase planners on Pinterest, I was the most inspired by one that used a collage of frames to display the weeks schedule. I found this frame at a Goodwill for only a few dollars and it works great! I use mine to write down important events or appointments for the week along with dinners for each night and an extra space for  a "TO DO" list. I've also seen frames used for meal menu planning as well.

The project was very easy to do. After finding the frame I wanted to use, I cut out scrap book paper to fit each section. I used my Cricut Cutting Machine to cut out the letters for each day of the week and glued them to the paper. Then added the paper like you would a picture! 


I have it hung in the kitchen, near the coffee pot, so every morning my husband and I can look at what we have going!


Thursday, July 26, 2012

DIY Game Room Art

I wanted to make a unique piece of art for our game room in the basement. We have a variation of all entertainment art ranging from music, movies to games. I had an extra "Monopoly Game" and "Scene It DVD Game" game and thought if I hot glued the boards together along with a few other game related items it would look pretty cool. Here is the finished product along with a few close ups. I mainly used a hot glue gun and cardboard wedges to add dimension!"


Wednesday, July 18, 2012

Cricut Road Sign Art

I wanted to make a few accent pieces of art to go with my Transportation Book Art that I made last week. I didn't make a tutorial on how to make these but here is a general step by step on what to do.

I bought a piece of black tag board and cut into the shapes of the signs I wanted to do. I then cut white scrapbook paper in the same shapes of the signs only slightly smaller so an outer black line would show. I used my Cricut to cut out all of the letters in black paper and simply glued them in place. 

I made 3 signs; Route 66, Speed Limit and a Railroad Crossing sign


Here is what the signs look like in my son's room. The railroad sign is not pictured, I hung that by his door.