Wednesday, June 27, 2012

Kids Blocks DIY Window Treatment

I have been trying to find a unique window treatment to finish off my son's playroom. As I was going through his toys to take out what he doesn't play with anymore I came across a bin of foam blocks. I thought they would make a fun window treatment and fit the theme of the room.

This is what you will need: Foam Blocks, shower curtain rings/hooks, curtain rod, pliers, long screw driver, fishing line and beads

 I pushed the screw driver through each block so they would be ready to string on the fishing line

I then measured the width of the window and place blocks on either end so I could loosely map out what I was going to do

Shower curtain rings come in a pack of 12 so I made 12 rows and put 4 blocks in each row. I pre planned to be sure I had enough blocks and to spread the colors out. I then simply started to string each row, putting beads in-between the blocks to separate them and to add additional color.


Here is a closer look at the shower curtain rings, I also add some beads to the ring. I thought it looked better then just the plain white ring

Here is another look of the finished product! Im very happy with how it turned out and I think it looks great in the room!

Wednesday, June 20, 2012

ABC Book

I saw this idea on Pinterest and loved it.  What better way for a kid to learn their ABC's than using pictures of their toys! With a camera and a little help from Shutterfly this was a pretty easy project. The hardest part was finding 
a toy for letter U!

I made a list of all the letters of the alphabet then put a name of a toy by it until I had a toy for each letter. I then took pictures and uploaded them to Shutterfly. Here is my picture for "M is for Monster Trucks"

Here are a few pages of the finished product. I am really happy with how it turned out and my son loves looking at it!


No Mess Finger Painting

This is a great idea for rainy days or when you don't feel like cleaning up the mess that comes with real finger painting. What you will need: Finger paints, Ziplock bags and packing tape.

 I then added paint to each bag. I decided to do this one to show my son what happens when two primary colors mix.

Use the packing tape to attach the top and bottom of the bag to the window or counter. I prefer the window because I think the effect is much cooler for the kids.

This project always keep him occupied for awhile. He likes to draw shapes and patterns on the paint. Sometimes we take his toy trucks or animals over the paint to see what kind of track they make.


Sunday, June 17, 2012

Creative Wall Art for under $20

First here is a look at the finished product. These were very easy and 
inexpensive to make. 


What you will need: 3 picture 8x10 picture frames, 3 small glass jars (preferably with a lip on the top), twine, flowers of choice, hot glue gun, staple gun and
nails/hammer to hang

We started by removing the back of the pictures so only the frames remained. I decided to hang them on the wall next to get the placement I wanted. I figured it would be easier to get the nails in place before the frames had the vases attached.

Using twine and my hot glue gun. I glued the twine around the neck of the bottle and then wrapped the excess over the top of the frame. I glued the twine to the frame as well in ensure it stayed in place. I would also recommend putting a staple in the back to hold the twine to the frame securely. I also added a thin line of hot glue to the back of the bottle. Once dry that allowed the bottle to have
some grip against the wall when hung.
 We then added flowers to give a pop of color! The flowers could also change with the seasons or to give your room a different look! 

Inspired by: http://favim.com

Wednesday, June 13, 2012

50th Birthday Party, Alaska themed

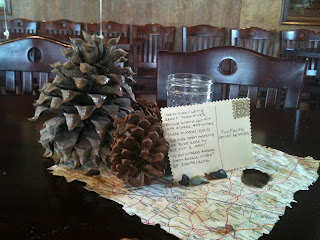
I recently helped plan a 50th birthday party. They wanted the party to be Alaskan themed since the birthday boy was taking a motorcycle trip through Alaska for his birthday. We decided to go more rustic with the decor with a vintage travel look. Here are a few pictures of the centerpieces, the room lighting was very dim so the pictures don't do the centerpieces justice.


Each table setting had a handmade postcard that had different fun facts about Alaska. I was surprised by how many people went to each table to read each postcard.

I bought scrapbook paper that look like a map. I antiqued the paper by poring coffee and dry coffee grounds on it. I then dabbed it dry with a towel and baked it on a low setting for just a few minutes. For added affect I burned the edges. 


We also used specialty candy to add a little extra to the table settings. We used Gold Mine gum, that came in a little sack, chocolate covered rocks and blue/white rock candy to look like glaciers/ice

Instead of a guest book I used the matte of a picture frame for all the guests to sign. This way the birthday boy can put a pictures of his trip inside and have it as a keepsake!

Jack's Playroom

I wanted to re-do Jack's playroom to make it more functional, personal and fun! I found some easy DIY art projects and bought a gallon of paint and in one weekend the room was done!

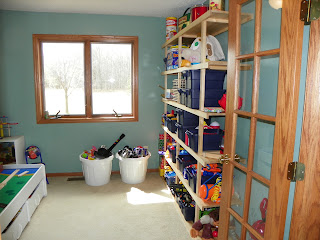
Here are a few views of the finished room


I have the toys higher up that are more supervised toys that are easily broken or have lots of small pieces. He knows to ask if he wants to play with anything he can't reach

Rain gutter books shelves worked great! I love that they don't take up any of the valuable floor space

Family Hand Print Artwork: I traced each of our hands in scrapbook paper and just layered them on top of each other

Crayon Art: This took some planning to get just right. I did look up on the Internet other crayon letters to see how to make the angles just right

ABC's Art: I bought a blank canvas at Walmart and painted it white. I then picked out some colorful pieces of scrapbook paper and cut the letters of the alphabet out with my Cricut. To attach the letters to the canvas I used Mod Podge and that worked great!